|
Wood tops from DeVos Custom Woodworking are made to your exact
specifications. Installation should be easily accomplished by a
construction specialist or a handy homeowner; however, it is very
important to follow receipt, handling and storage instructions of the
tops before installation.
Please read ALL of the installation instructions before installing your
wood top. Failure to properly install your
wood top will void the warranty.
Receipt and Storage of the Top
Upon receipt of your top from the freight company, check to ensure that
the package or crate is in good condition. Please note any
and all damage to the crate or packing materials directly on the
delivery notes.
You MUST uncrate your custom wood top within 48 hours of
receiving the crate. You will need a no. 2 square head screwdriver
to open the crate. Remove the entire countertop from the
crate. If it is not being installed at this time, it should be
stored horizontally on "stickers" in a climate-controlled room.
Stickers are boards (usually 1/2" to 1" thick by about 1-1/2" in width)
that are laid horizontally to the top on a supported surface. The
top is placed on top of the stickers to enable air to flow under the top
while it is being stored. Stickers should be placed to support the
ends and the middle of the top.
Concealed Damage:
If, upon opening the crate, you discover damage to any part of
the custom wood top, you must report the damage to FedEx Freight and to
DeVos Custom Woodworking immediately.
Failure to report damage within 48 hours will relinquish your right to
make a claim for any damage that may have occurred during shipping.
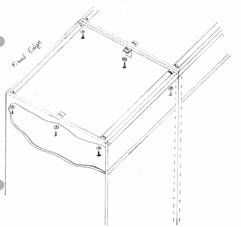
Preparing the Top for Installation
We do not include screws with the countertop because there are many
variations in how long the screw should be in securing the countertop to
the cabinetry. You will need a good-quality wood screw that is
long enough to go through the corner block (or other attachment device)
and penetrate the wood countertop to at least one half of the thickness
of the top.
|